How To Connect Your Custom HTML Form To Google Form Response API

Data collection with Google Forms and spreadsheet API
There was a time when I needed to create a data collection form for over three thousand users without a custom backend server. I checked third-party APIs, but their pricings were not favorable. Even the tutorials and articles I read were complicated and not straightforward, so I decided to study and play with the Google form API to understand how things were handled under the hood. When I came out of that exhaustive research, I was able to come up with the simplest yet most efficient solution.
Google Forms is a free web-based application that allows you to create and manage surveys and quizzes. You can create forms with multiple-choice questions, and text boxes, and also customize and analyze the responses. Google Forms integrates with other Google tools, such as Google Sheets and Google Drive, making it easy to share and collaborate on forms with others.
In this article, I'll show you how you can integrate google Forms into your custom form using the almighty google form response API without any npm package or backend server.
Prerequisites
Before you begin this tutorial you'll need the following:
Web Browser
Browser DevTools
Prior knowledge of HTML & CSS
Prior knowledge of JavaScript
Google Form
Let's Get Started
Login to Google Forms and create a form with the number of input fields of your choice similar to the one in the image below.
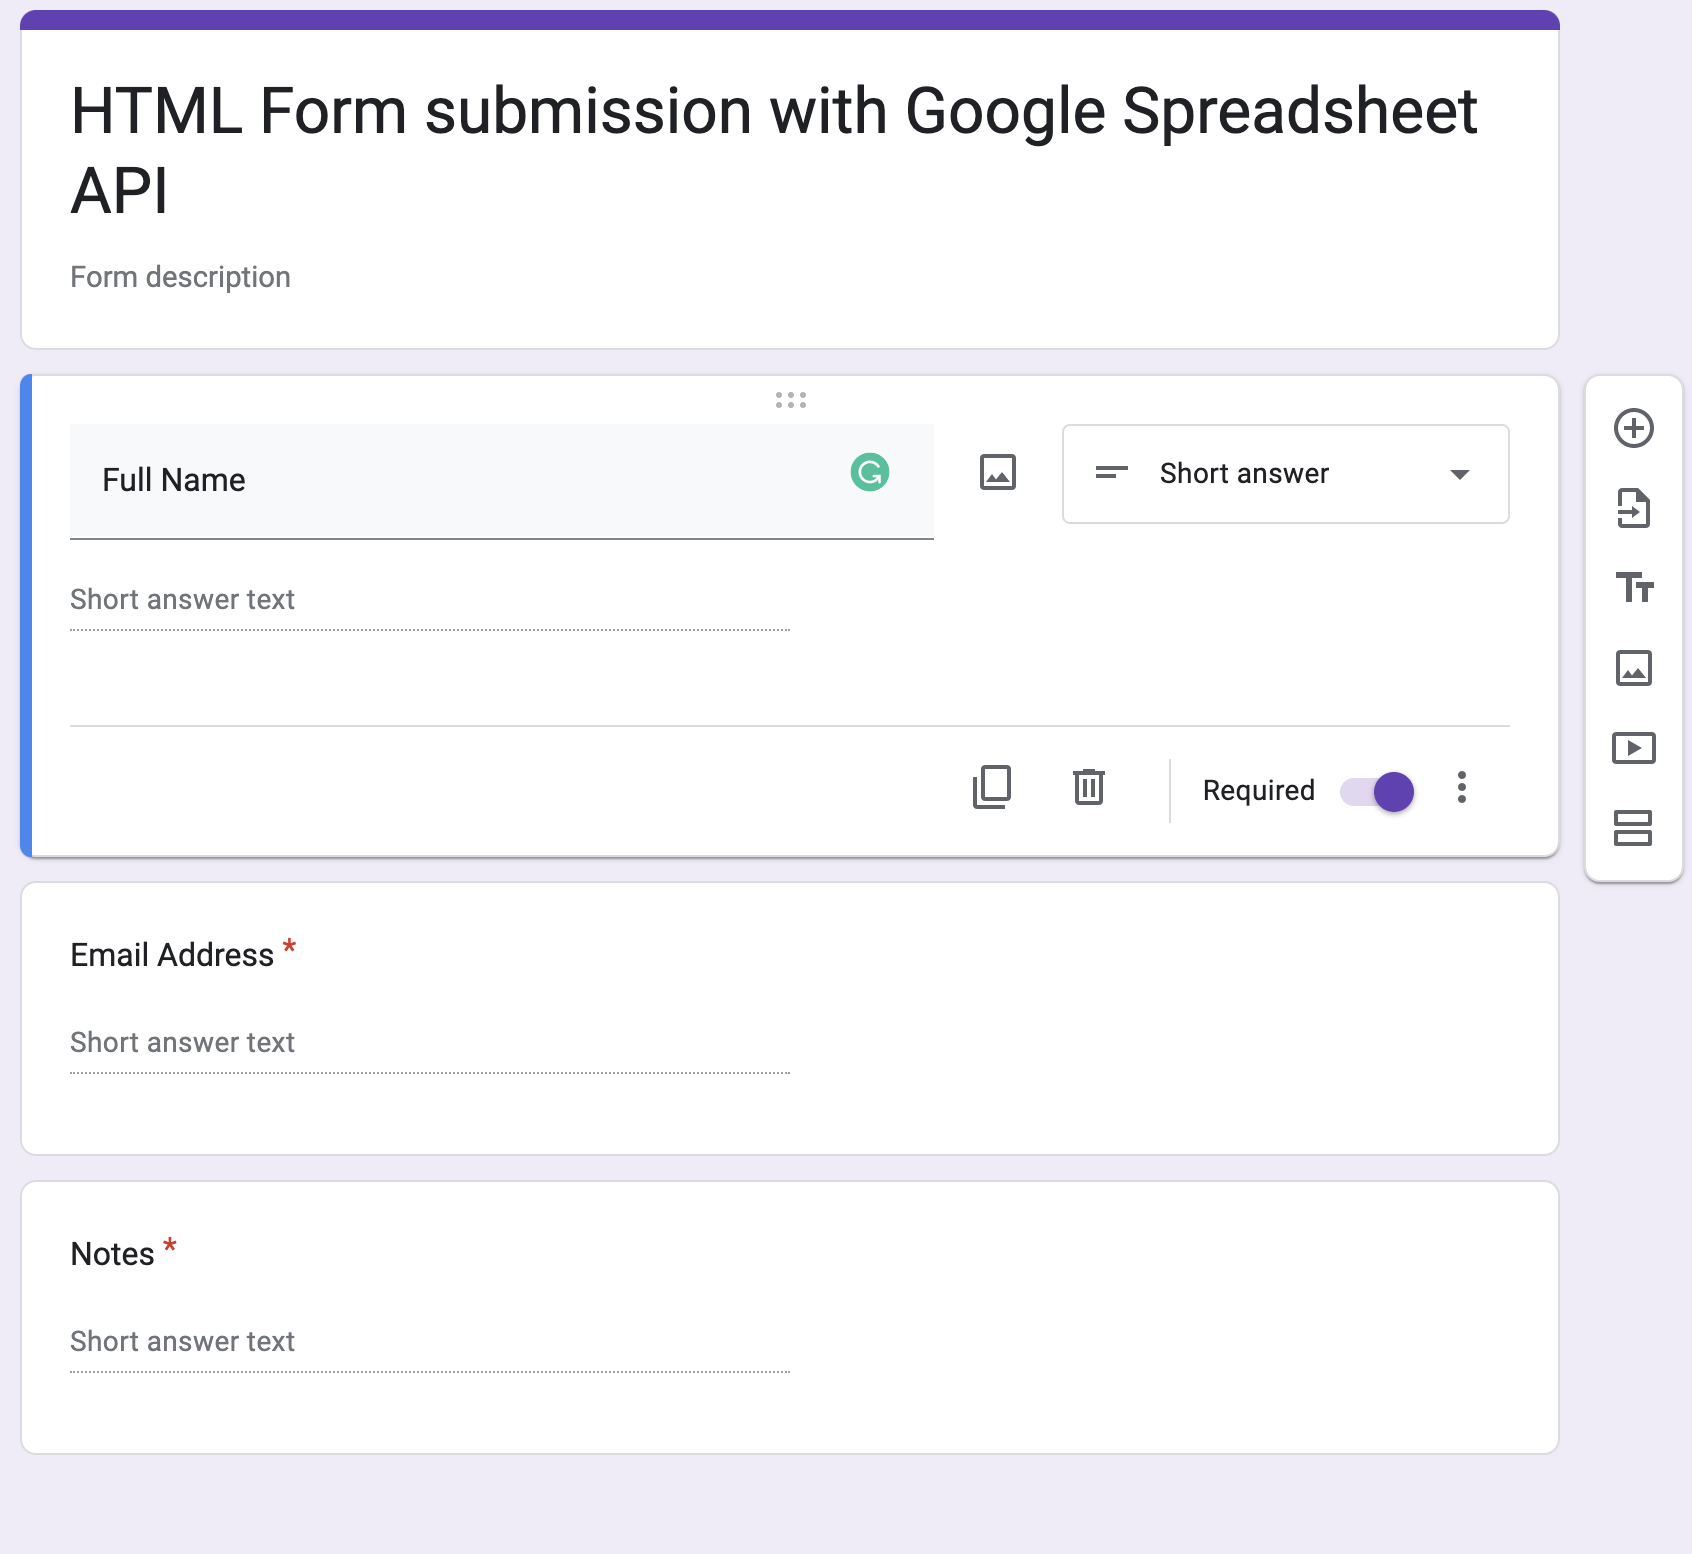
It's vital to note that this approach only supports short answers or paragraph-type of input. If you need to add a dropdown, just display the list on the front end using select and options tags and then make it a short-answer input type on the google form here.

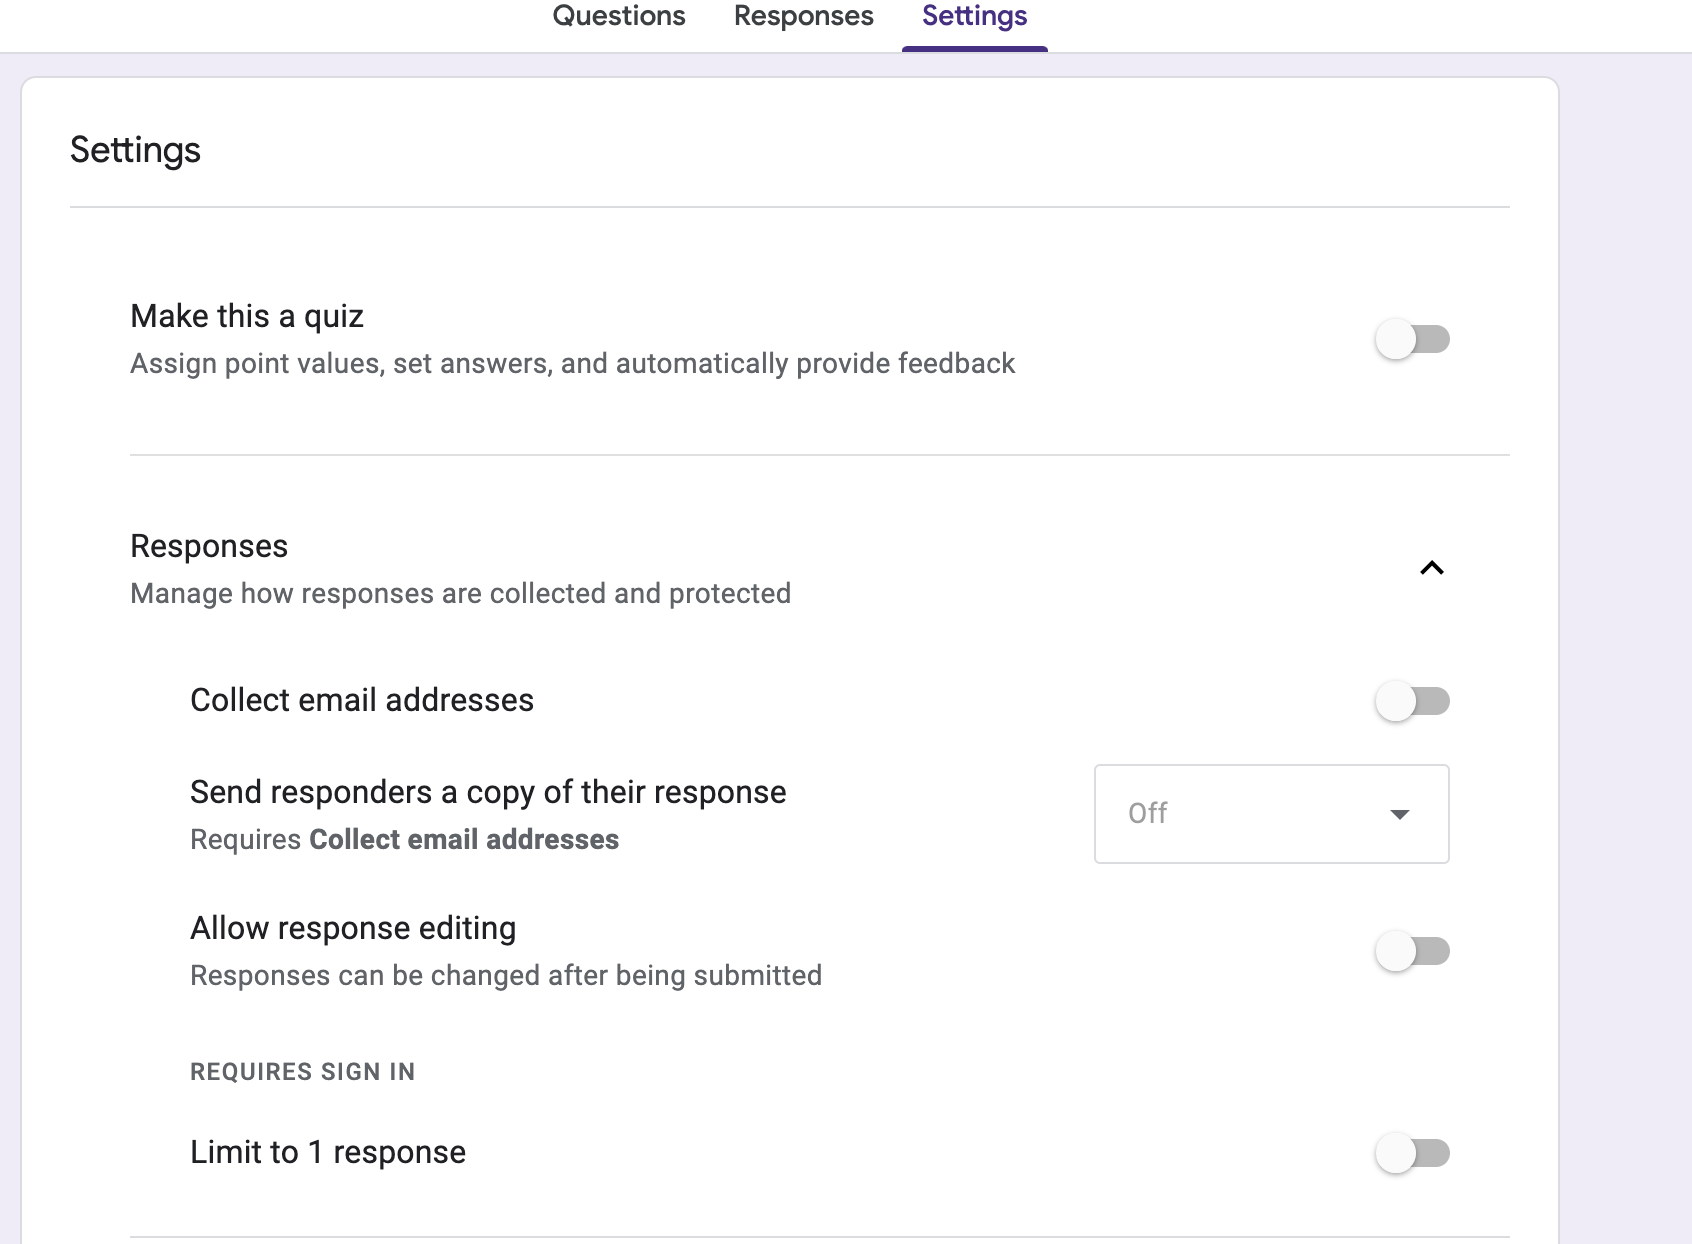
Also, ensure that all options under the responses tab are not checked:
Once you're done creating and editing the google form, hit the preview button at the top right corner of the window. This would open another tab where users can fill out the form. Open the devtools and inspect the elements; here we want to get the form URL and the name of all the inputs:
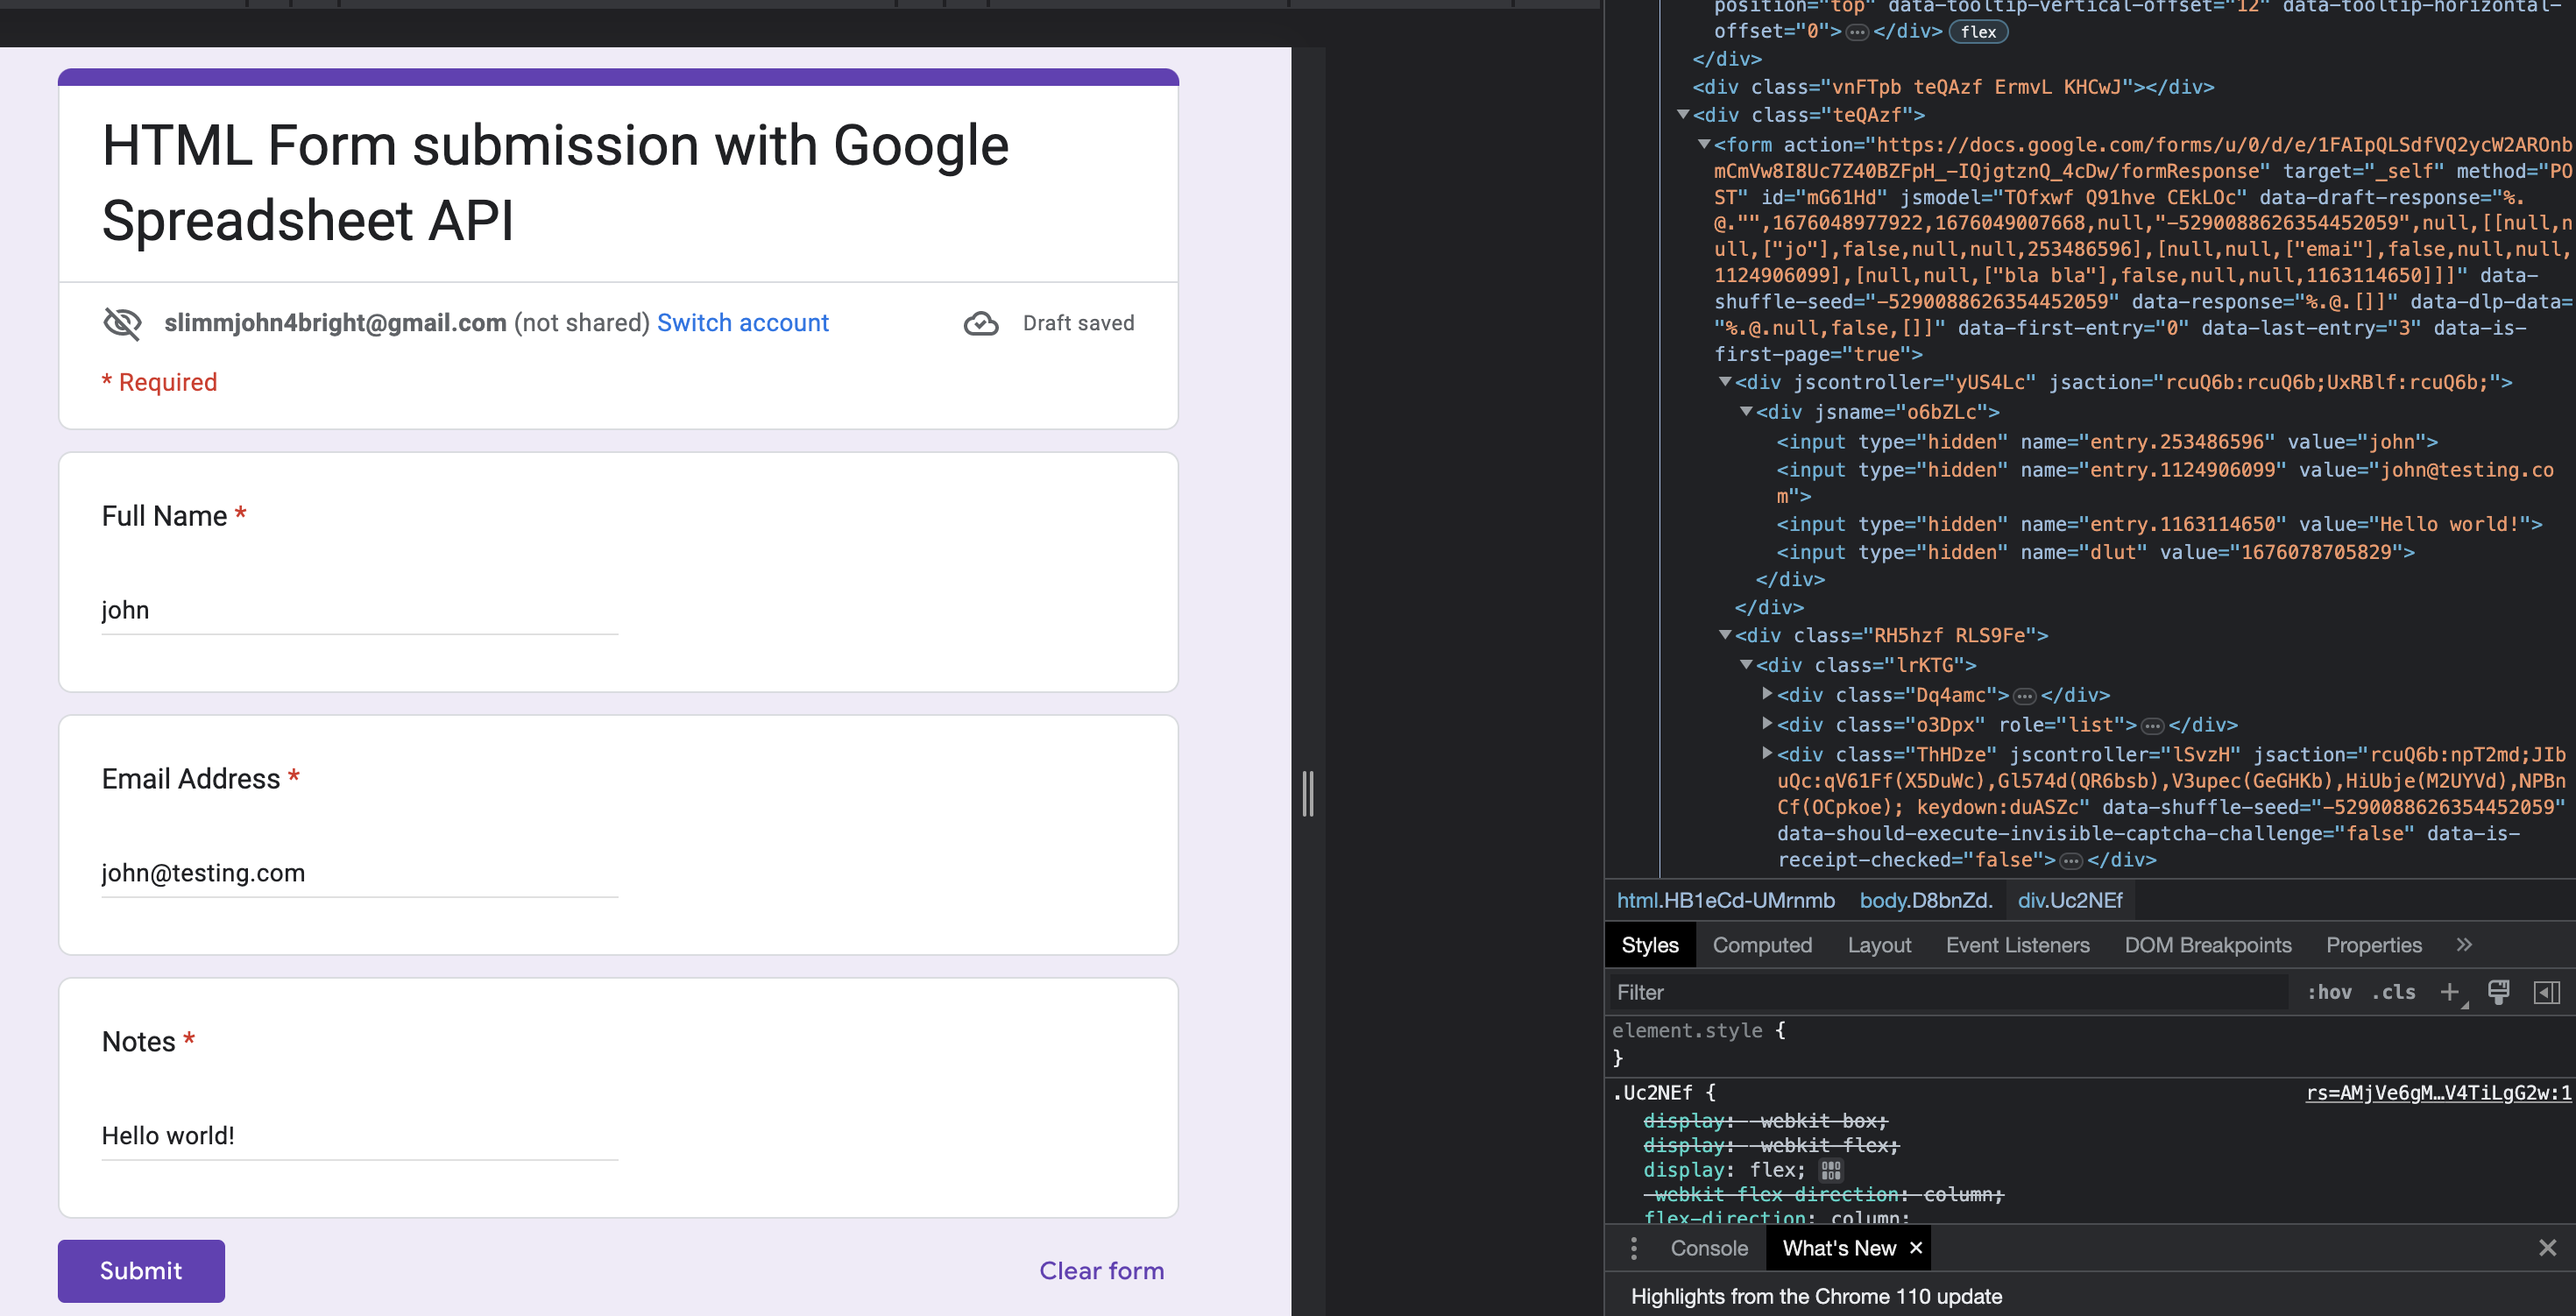
In the above snapshot, you can see the form URL in the action attribute of the form and input names for Full Name, Email Address, and Notes which are prefixed with entry.
To see the responses, click on Link to sheets and create a new google spreadsheet:

Launching Vs Code
Create a folder with any name of your choice and add an index.html, style.css, and app.js files to it.
mkdir html-form-googleAPI
// and
touch index.html style.css app.js
After you run the commands above, launch and open the folder in vs code. Your folder structure should look like that of the one in the snapshot below:

Open the index.html file, then copy and paste the code below into it.
<!DOCTYPE html>
<html lang="en">
  <head>
    <meta charset="UTF-8" />
    <meta http-equiv="X-UA-Compatible" content="IE=edge" />
    <meta name="viewport" content="width=device-width, initial-scale=1.0" />
    <link rel="stylesheet" href="style.css" />
    <title>HTML Form Google API Submission</title>
  </head>
  <body>
    <main class="container">
      <h1>Fill this form</h1>
      <form id="form">
        <label for="fullName">
          Full Name:
          <input type="text" name="fullName" id="fullName" required />
        </label>
        <label for="email">
          Email Address:
          <input type="text" name="email" id="email" required />
        </label>
        <label for="email">
          Notes:
          <textarea name="notes" id="notes" rows="8" required></textarea>
        </label>
        <button type="submit" id="button">Submit</button>
      </form>
    </main>
    <script src="app.js"></script>
  </body>
</html>
Also, open the style.css file and paste the code below into it:
:root {
  --border-radius: 5px;
}

.container {
  width: 100%;
  max-width: 750px;
  margin: 0 auto;
  padding: 20px;
}

#form {
  display: flex;
  flex-direction: column;
}
label {
  display: flex;
  flex-direction: column;
  padding-bottom: 20px;
}

input,
textarea {
  padding: 15px;
  border: 1px solid gray;
  border-radius: var(--border-radius);
}

button {
  background: rgb(7, 67, 49);
  border: none;
  color: #fff;
  padding: 15px;
  cursor: pointer;
  border-radius: var(--border-radius);
  margin-top: 15px;
  transition: all 0.3s ease-in-out;
}
button:hover {
  filter: brightness(1.5);
}
And then finally open the app.js, then copy and paste the code below into it:
"use strict";
const fullName = document.querySelector("#fullName");
const email = document.querySelector("#email");
const notes = document.querySelector("#notes");
const button = document.querySelector("#button");
const form = document.querySelector("#form");
const GOOGLE_FORM_URL =
  "https://docs.google.com/forms/u/0/d/e/1FAIpQLSdfVQ2ycW2AROnbmCmVw8I8Uc7Z40BZFpH_-IQjgtznQ_4cDw/formResponse"; // your google form response URL e.g https://docs.google.com/forms/u/0/d/e/1FAIpQLSdfVQ2ycW2AROnbmCmVw8I8Uc7Z40BZtjleJ_-IQjgtznQ_4cJl/formResponse

const handleSubmit = async (event) => {
  event.preventDefault();
  const fullNameValue = fullName.value;
  const emailValue = email.value;
  const notesValue = notes.value;
  const formData = {
    "entry.253486596": fullNameValue, // entry.253486596 is the name attribute for the full name field on our google form
    "entry.1124906099": emailValue, // entry.1124906099 is the name attribute for the email address field on our google form
    "entry.1163114650": notesValue, // entry.1163114650 is the name attribute for the notes address field on our google form
  };
  const appendedFormData = newFormData({ ...formData });

  try {
    button.disabled = true;
    button.textContent = "processing...";
    const response = await fetch(GOOGLE_FORM_URL, {
      method: "POST",
      mode: "no-cors",
      headers: {
        "Content-Type": "application/json",
      },
      body: appendedFormData,
    });
    alert("Form submitted to google spreadsheet successfully!");
  } catch (error) {
    alert("Something went wrong, please try again");
    console.log(error);
  } finally {
    button.disabled = false;
    button.textContent = "Submit";
  }
};

form.addEventListener("submit", handleSubmit);

// A helper function to help convert the data to FormData
const newFormData = (inputs) => {
  const formData = new FormData();
  const newArr = Object.entries(inputs);
  newArr.map((item) => {
    return formData.append(`${item[0]}`, item[1]);
  });
  return formData;
};
NOTE: For React developers, your form input state would look like this:
const [state, setState] = useState({
"entry.253486596": "", // For full name
"entry.1124906099": "", //for email address
"entry.1163114650": "" // for notes
})
And your HTML Form would look like this:
   <label for="fullName">
     Full Name:
          <input type="text" name="entry.253486596" id="fullName"      value={state["entry.253486596"]} onChange={handleChange} required />
   </label>
   <label for="email">
     Email Address:
    <input type="text" name="entry.1124906099" id="email"  value=
    {state["entry.1124906099"]} onChange={handleChange} required />
    </label>
   <label for="email">
    Notes:
    <textarea name="entry.1163114650" id="notes" rows="8"
    value={state["entry.1163114650"]} onChange={handleChange}
     required></textarea>
    </label>
        <button type="submit" id="button">Submit</button>
      </form>
To update the state, your onChange handler would look like this:
const handleChange = (event) => {
const {name,value} = event.target
setState(prevState => ({
...prevState,
[name]:value
}))
}
Conclusion
This is the simplest approach to hook Google Forms with custom HTML forms. Although, there's a limit to how much it can do. For instance, when creating the google form, you can only use the short-answer or paragraph type of input for this approach to work.
Check out the complete source code on this Github repository
Thanks for reading.


